This past spring we moved into the largest space that we’ve possibly ever inhabited. It’s not large by our normal North American standards for a family of 5 but to us it’s ginormous! We sorta like the small space living thing and have desired to keep that our norm because we’ve learned that the bigger the space you have the more you fill it! And of course, the more you fill it the more money you spend on things like art and candle holders and just a whole lotta stuff.
We’re not big on stuff around here. Actually, we are. I just straight up lied. We like stuff a lot! That’s the problem. Our love for stuff doesn’t really fit with our love for Jesus and so to intentionally live with less stuff for the purpose of loving Jesus more and spending our money on better things than another trinket from Winners we realize that living smaller is good for us. Healthy. Keeps our parameters in check. Helps us live the way we desire to.
We have been incredibly blessed with our new home and we know that it is an absolute gift from God. All 2,000 square feet of it! (I need to do a post sometime about how our boys all still sleep in one room at 14, 12 and 10, though it’s not necessary. They like what they know and what they know is 3 boys, 1 room.)
I knew when we moved into this space that it was going to be tricky. Tricky because we don’t have enough stuff to fill it and yet we have more than enough of what we need to live. So the question became how are we going to live here and not immediately rush out and buy enough furniture to actually make the place seem lived in? And how are we going to leave shelves undecorated for our lack of ornamental birds and other such things people seem to place on shelves. How are we going to keep our closets and cupboards, which now all have empty shelves, still empty 10 years from now! Basically, how are we going to keep our desire for simple and push aside the unnecessary when we have more spots that could use unnecessary filling.
It’s tricky.
And it’s so good for us.
I started dreaming about Christmas back in the summer because I knew I was going to have to get creative. How does one decorate such a space for a holiday season when in the past we’ve simply rocked a 2 foot potted tree and only have enough decorations to fill that said 2 feet. How were we going to adorn our mantles (two of them!!) for a season of Joy when we’ve never had such a gift before. How were we going to not rush off to Restoration Hardware and Pottery Barn and Crate and Barrell and fill our baskets with pretty, shiny, twinkly things to decorate for the season?
Well, God is keeping it real for us by blessing us with insufficient funds to do such a thing. Thank-you, Jesus!
So, my absolutely uncrafty mind started thinking. How could we do this Christmas thing well without becoming a consumer of the season?
I’ve started to decorate because when you have to get creative and finding a pair of scissors in your home is a major ordeal you must start early. After I instagrammed a photo of my latest project, the response was lovely and so I thought maybe I’d pass on to you some of the things I’m coming up with for cheapola decorating that doesn’t leave your home looking like you live and breathe dollarama. Or at least, I don’t think it does.
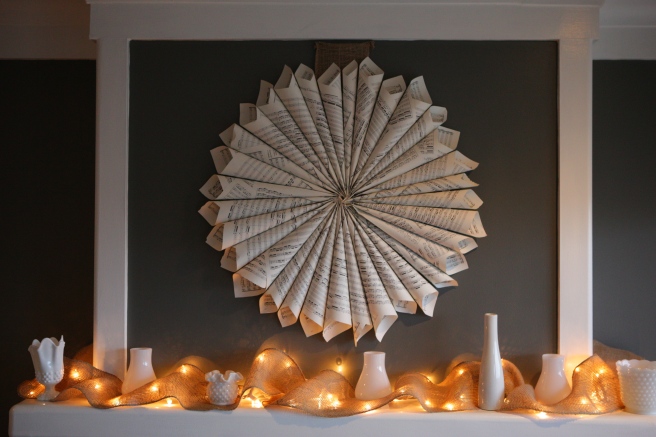
First up, this little number that I constructed the other night. It cost me $1.00. That’s a dollar well spent, I believe.
 The dollar was spent on a music book I purchased from a thrift shop. I chose Bach because he sounds fancy and Christmas is sort of a fancy affair. When I got home with it I browsed through the pages, marvelled at Bach’s handiwork for a minute or two and then started tearing it up! (note: it feels better to tear up books if you acknowledge the hard work someone put into it before doing so!)
That’s step one. Simply tearing out pages and trimming the edges so they’re straight and clean. After that, you start rolling your cones. I’m sure there is some sort of technique you could look up for this. I simply rolled and slapped a piece of scotch tape on to hold it.
You should probably know at this point that I am not a perfectionist and slightly impatient. But it’s okay because I’m good with wonky and too much uniformity makes anything suspect. So I didn’t worry about my cones being exactly the same size or tightness. I just went with it until I had a living room floor full of ’em.
I wasn’t sure how to fasten them all together. I’m a doer. All action, little forethought. So when it came time to actually make the wreath I turned to my beloved hubs (the problem solver in the fam) and said, “Help?” I made sure to bat my lashes. This definitely helps to get a man involved in your crafty schemes.
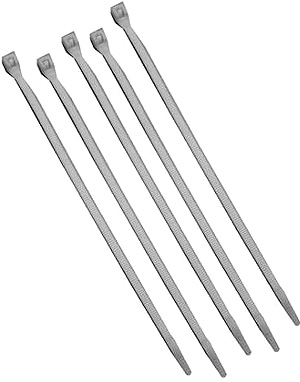
He came up with a brilliant (and manly!) solution. After a short trip to the garage he came back with one of these babies!
 If you need to buy one it’s called a zap strap. If you knew that already, you get bonus points.
I’m sure there are a bazillion tutorials online about how to fasten these that don’t involve zap straps but I’m not really big on taking the easy road by watching others. I feel like I should be able to just figure it out and make things happen. Clearly, I am wrong. But I married the right man!
So I squished the bottom of each cone and hole punched it so that the hole was going through the side. (not top to bottom) Once all cones had a hole I simply put the zap strap through each one and voila! It started to form a wreath! I think this has to be the easiest way on the planet to hold this many cones together. After feeding your strap through each one pull the one end through the other until it sort of clicks to lock it and you have many cones that are not going anywhere!
After this step I did roll a piece of tape and place it on the side of each cone to stick them together. This way each cone is tightly pressed up against its neighbours like a happy cozy pile of cones. Cones aren’t big on personal space so they’ll be okay with it. Unlike me who highly values personal space. Take note, readers. Hugs are not my love language!
Once I got this far I realized that I should probably fasten something to the back of the wreath to make it sturdy. I rummaged in the garage until I found a dirty old cardboard box. I cut a square out of it and hot glued it haphazardly to the back of my wreath. I will not show you a picture of this as I’m sure you will lose respect for me, it’s that ghetto.
I then hot glued a random piece of burlap to the cardboard to act as my ‘ribbon’. I don’t own ribbon, people! But you might, so you can use that. The burlap worked well though because once I put two little nails in the wall I could just hook the burlap over them and it just hung there. Yay!
This entire project took me about an hour and a half including rummage time. After an hour of trying to make something I reach my end so this was a bit of a stretch for me! But once it was hanging I was incredibly pleased with the result. Or at the very least, it beats the little plastic santa figure I could have purchased at the dollar store for the same amount of money!
Happy DIY’ing homies!
p.s. if you make one of these bad boys please send me a pic! Or leave a link to it in the comments! I want to see!!!

